Use WebMaxy with Zapier
Zapier allows you to connect with more than 5000 apps and services. Zapier is also known as an online automation tool that can be integrated with the number of applications you want to automate – no need for coding.
You need to select one trigger app (like WebMaxy). After trigger, you need to select action i.e. what you want to perform automatically. This is a single zap and you can perform 100 actions at a time with a single zap. This integration allows you to use the following WebMaxy tools as triggers:
- Recording
- Feedback
- Surveys
How to start? #
- You need a zapier account and a WebMaxy account.
- The WebMaxy Zapier integration is only available on the Observe and Ask Business and Scale plans.
- Only the Account Owner or an Admin of your WebMaxy account can enable the Zapier integration in WebMaxy. If enabled, then any Team Member having “Read & Write” access or higher will be able to create a Zap.
- Before collecting any data, WebMaxy needs the WebMaxy Tracking Code to be installed on your website.
- For collecting data that will trigger actions in Zapier, one of the above tools must be actively targeting users on your website.
Enable Zapier Integration in your WebMaxy Site settings. Once enabled, You can create a Zap from Recordings Segments, Feedback widgets, or Surveys.
How to Enable the Zapier integration in your WebMaxy Site settings? #
If the Zapier integration is enabled in the site settings then the “Create a Zap” button will appear as an option in the top left corner.
Step 1. Go to WebMaxy Website Page
Step 2. From the menu, select the website where you wish to enable the integration.
Step 3. Click on the Connect Zapier button.
A Zapier prompt will appear. After granting WebMaxy permission to integrate with your Zapier account, you’ll be returned to the WebMaxy interface. Now, your Zapier integration is active and all Team Members with “Read & Write” access or higher can create Zaps based on WebMaxy events.
How to Create a Zap for a Feedback widget or Survey? #
- Open the Feedback or Surveys dashboard.
- Edit the Feedback widget or Survey.
- Click on the small arrow icon, to the right of the View Responses button and select Edit from the drop-down menu.
- In the tool options, click on the Forward Feedback section.
- Click on the Create a Zap button.
For more details of the Zap creation process, refer to Zapier’s Getting Started Guide.
How to Create a Zap from your Zapier account? #
If you don’t have a Zapier account, you can visit their site to sign up for free.
- Log in to your Zapier account or click on sign up to create a new account.
- Click on Menu and go to My Apps.
- Click on Add connection and select “WebMaxy” from the app list.
- Connect your WebMaxy account to Zapier by using your WebMaxy account credentials.
- Now, start creating a Zap.
Create a Zap with no coding knowledge, and you will be guided through the process step by step. For more details on the Zap creation process, refer to WebMaxy’s Getting Started Guide.
Suggested WebMaxy Integration #
Our team uses Zapier to connect WebMaxy data to other tools. Some examples are given below.
- WebMaxy + Miro: Use the user’s voice to come up with solutions that are engaging. WebMaxy Miro integration allows the creation of cards in Miro from new Feedback responses. It’s become easier to focus on areas for improvement, by sharing negative feedback with other teams.
- WebMaxy + Google Sheets: Find trends in your Recordings. When there’s a new WebMaxy recording containing rage clicks then a new row is added in a Google sheet. Plot a line graph by using data so you can monitor rage clicks over time, making it easier to find trends and respond when you notice an upsurge in behaviors.
WebMaxy + Trello: Make user interview recruitment a simple process. If a user indicates in a WebMaxy survey that they would like to chat, their contact information is forwarded automatically to one central Trello board.
WebMaxy + Google Sheets #
Connect WebMaxy to Google Sheets through Zapier’s setup options with the help of following steps. These steps should be used in Zapier’s setup process, however at Zapier’s platform, it’s possible that some steps may vary slightly over time.
- Select New Recording as the Trigger Event
- Select the WebMaxy Site that you want to extract data from
- Click on Test trigger to ensure Zapier is able to connect to your WebMaxy Site
- Select Google Sheets as the Action app
- Select Create Spreadsheet Row as the Action Event
- Select Google Sheets account that you would like to use
- Select Spreadsheet, Drive, and Worksheet that you would like to use
- Select WebMaxy Recording Info that you want to send to Google Sheets
- Click on Test and Continue to make sure Zapier is able to deliver WebMaxy data to Google Sheets
If you are satisfied with the test results, click Turn on Zap and it’s done. If not, you can review your configurations and make required changes.
WebMaxy + Miro #
Connect WebMaxy to Miro through Zapier’s setup options with the help of following steps. These steps should be used in Zapier’s setup process, however at Zapier’s platform, it’s possible that some steps may vary slightly over time.
- Select WebMaxy as the Trigger app
- Select New Feedback as the Trigger Event
- Select the WebMaxy Site that you want to extract data from
- Click on Test trigger to ensure Zapier is able to connect to your WebMaxy Site
- Select Miro as the Action app
- Select Create Card Widget as the Action Event
- Select the Miro account that you would like to use
- Select the Frame, Board and Card Title that you want to use in Miro
You can also include additional information such as Card Description, Card Title Link, Card Border Color, and Card Due Date.
- Click on Test and Continue to make sure Zapier is able to deliver WebMaxy data to Miro
If you are satisfied with the test results, click Turn on Zap and it’s done. If not, you can review your configurations and make required changes.
WebMaxy + Trello #
Connect WebMaxy to Trello through Zapier’s setup options with the help of following steps. These steps should be used in Zapier’s setup process, however at Zapier’s platform, it’s possible that some steps may vary slightly over time.
- Select WebMaxy as the Trigger app
- Select New Survey Response as the Trigger Event
- Select the WebMaxy Site that you want to extract data from
- Select the Survey that you would like to use
- Click on Test trigger to ensure Zapier is able to connect to your WebMaxy Site and survey
- Select Trello as an Action app
- Select Create Card as an Action Event
- Select the Trello account that you would like to use
- Select the Board, List, and Name that you would like to use for your new card in Trello
You can also include additional information such as the card position, member, due date, file attachments, URL attachments, checklist name, and checklist items.
- Click on Test and Continue to make sure Zapier can deliver data from WebMaxy to Trello.
If you are satisfied with the test results, click Turn on Zap and it’s done. If not, you can review your configurations and make required changes.
Having trouble? #
Make sure you’re fulfilling all the requirements stated at the start of this article. Contact our support team if you’re still having issues, and we will be glad to assist you!
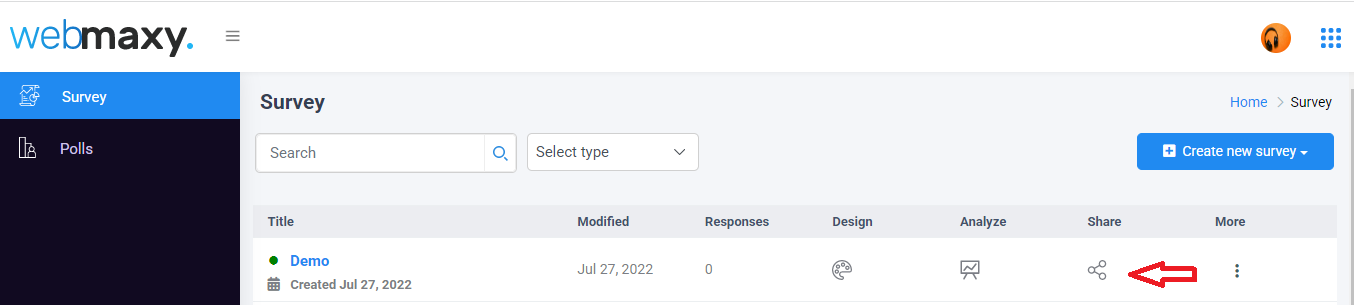
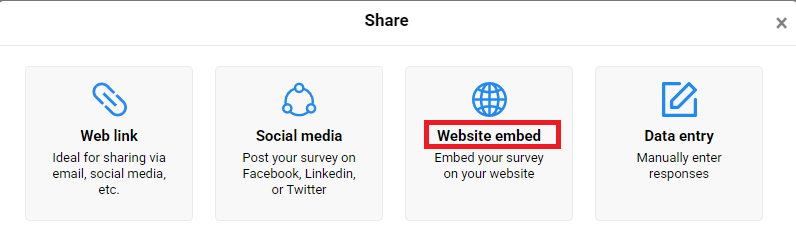
STEP 3: Select the Website embed option.
STEP 4: Click on the Click to copy button
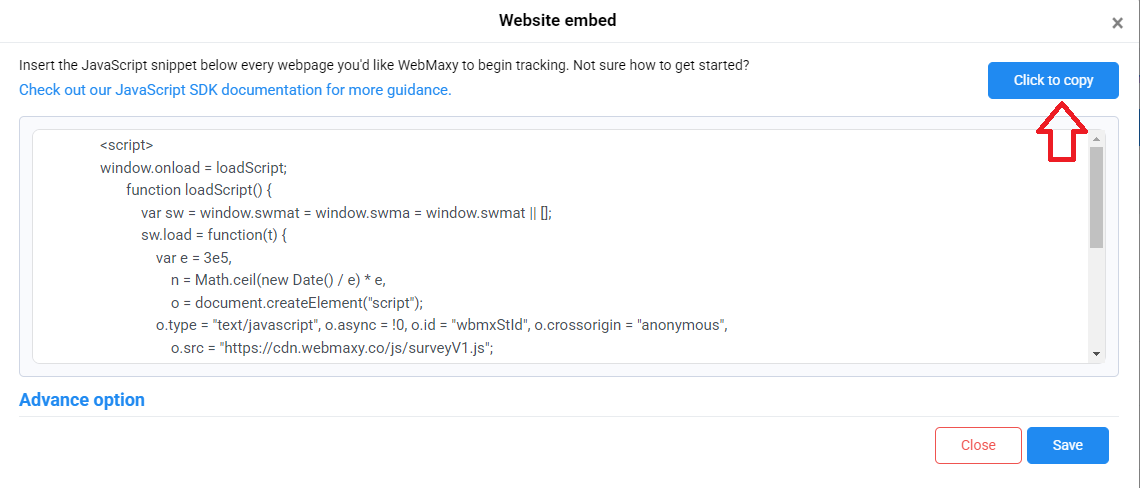
STEP 5: Go to the live website code where you want to add the Survey and paste the copied WebMaxy Survey/Poll tracking code within the <head> </head> tag.
STEP 6: WebMaxy will auto-detect the verification process.
Once the WebMaxy code is successfully added to your site, the Survey/polls will reflect on your website as per triggers settings.
Adam Wilson #
Adam Wilson comes with an experience of 12+ years in the IT industry. As a Customer Success Manager, he has been researching and trying to understand the customers’ behavior in different scenarios. He has also studied human psychology to relate it to the purchase journey of the customers. His published books on customer psychology and behavior have received many honors and awards from various enterprises.


